How to Install Artificial Hedge Tiles and Green Wall Panels
Installing artificial hedge tiles and the readymade green walls is very straightforward.
Artificial Hedge Tiles
INDOOR WALLS (gib, ply or timber)
Screw the tiles to the wall in rows (top, middle and bottom) 500mm apart. Staples (14mm) are okay in some situations but screws are preferable. The tiles can be clipped together to make larger panels before fixing to the wall or they can be installed individually. To ensure a uniform area if the clip the tiles together first. They join with the lugs and eyelets along the outer plastic strip of the tile
OUTDOOR WALLS
The same as for indoor walls but use galvanised button head screws, or if you are near the coast use stainless steel button head screws (available from Bunnings). Alternatively you can use ordinary galvanised or stainless steel screws with washers
CONCRETE, BRICK OR MASONRY
For installing on concrete block, brick or concrete see the PDF below. This gives detailed information regarding all types of substrate.
FLUFFING UP THE FOLIAGE
Seamless Joins
When you unpack the panels you will notice some flattening of the foliage due to packing. So to make the panels look their absolute best, fluff up and primp the foliage using your fingers or use a soft brush to smooth over the joins. This gives greater bulk and texture and has the effect of bringing them to life. Definitely worth the extra effort!
Readymade Vertical Garden Panels
We import our readymade green walls already made up in 1m x 1m panels. Their installation is more or less the same as it is for the tiles
To install on a wall or fence, fix the panel with 3 button head screws (with washers) along the top, middle and bottom. One person can manage it quite easily but it’s a lot easier with two. One to hold the panel in position and one to screw. If the panels are going outdoors use galvanised buttonhead screws or ordinary galvanised screws with washers. When the panels are installed, arrange any plants that may need some tweaking to achieve a natural way of growing
Custom Vertical Gardens
Our custom made green walls are made in our workshop using plants import for the purpose. They have a 12mm ply backing painted black, a layer of artificial leaf tiles are attached to this then about 40 artificial plants have their stems pushed through the foliage and stapled to the ply. The cost depends on the quantity of plants used
Those you see on our custom made product page are examples of some of the wide range of vertical garden designs we make. You may like a mix of plants you see in the samples and choose to have more of one kind and less of another. This gives you the customer the ability to specify a vertical garden made of the plants you like best. To choose your own palette of plants, select from our standard range of plants or copy and paste a photo from the custom made range here and mark the plants you want us to use. We can then design a layout using the marked plants.
Once the panels are installed, the plants will need some tweaking them a natural looking form. The larger ferns need their fronds fanned out and appearing to grow outwards and hanging naturally with the effect of gravity. Grass like and spear leaved plants need their leave opened out a little while all growing out and up as they would in nature. Broad leafed plants can tweaked to cover more area if needed. Most of the plant stems are plastic coated wire so they are easy to shape as required.
Hire an Installer (Auckland only)
If you are based in Auckland and need someone to install any of our products, give our installer Dean Saunders (details below) a call or send him and email.
Dean Saunders is the owner of Outlook Landscapes and really knows his stuff when it comes to installing our products. Check his website out here https://www.outlooklandscapes.co.nz/
Dean designs and creates beautiful landscapes so knows how to make our products look their best.
If you need someone to install any of our product call or email DEAN SAUNDERS.
Ph: 021 244 6524
For information on installing on different surfaces: Timber, concrete block, brick or concrete see the PDF Installation of ReadyLeaf Products below. This gives detailed information regarding many types of substrate.

Installing Artificial Hedge Tiles on Different Surfaces
Building a Hedge in the ground
Build your own boxleaf hedge
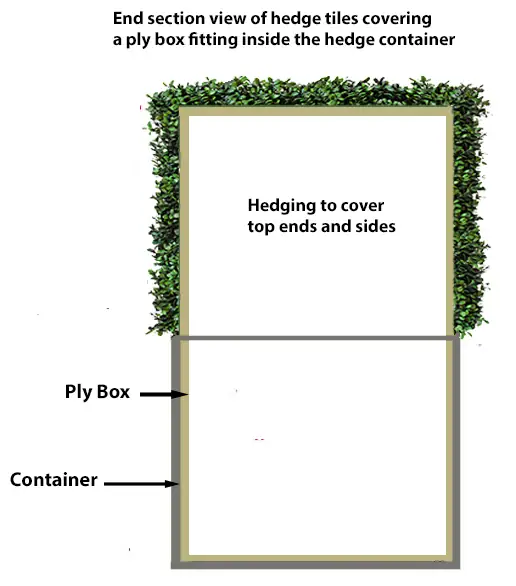
HEDGE IN A CONTAINER Building a box hedge for a container requires some basic carpentry skills.
1. Build a ply box that fits tightly into your container and gives the height you want above the container.
2. Give the box 1 coat of black or dark green paint.
3. Cut separate pieces of hedge tile to exactly match the top, sides and ends of the box. Make sure to trim the outer strip of plastic to ensure
there is no gap visible on the corners where the top, side and ends meet. (these are cut to begin from the top of the container.
That is all there is to it. See the diagram below.
HEDGE IN THE GROUND Please refer to the PDF https://readyleaf.co.nz/wp-content/uploads/2025/06/Hedge-in-Ground-I.pdf RLHedge in ground above